

Antibodies are essential and ubiquitous tools in biology, but their unguarded usage can easily lead to error. Here’s how to validate their specificity, and ensure that they’re hitting the right target.
The range of applications for antibodies is vast – their ability to bind to a particular target makes them indispensable reagents in a whole swathe of biological fields, from fundamental cell biology in the lab to diagnosis of pathogens in the field.
Not only that, but the increasing commercialisation of antibody production has meant that many are now available off the shelf. And for those prepared to wait, there are plenty of companies offering custom antibody production against any antigen of your choice.
This ready availability creates its own problems, however. All too often, commercial antibodies are used without validation, and – even more worryingly – may not have been correctly validated in the first place. Time and again, published papers are being retracted (thereby contributing to the Reproducibility Crisis) because the specificity of the antibodies used has turned out to be suspect or even spurious.
So whether you’ve just generated your own, or if you’ve obtained one from a collaborator or commercial source, here’s a short guide to making sure that they’re hitting the intended target.
Step 1. Immunoblot
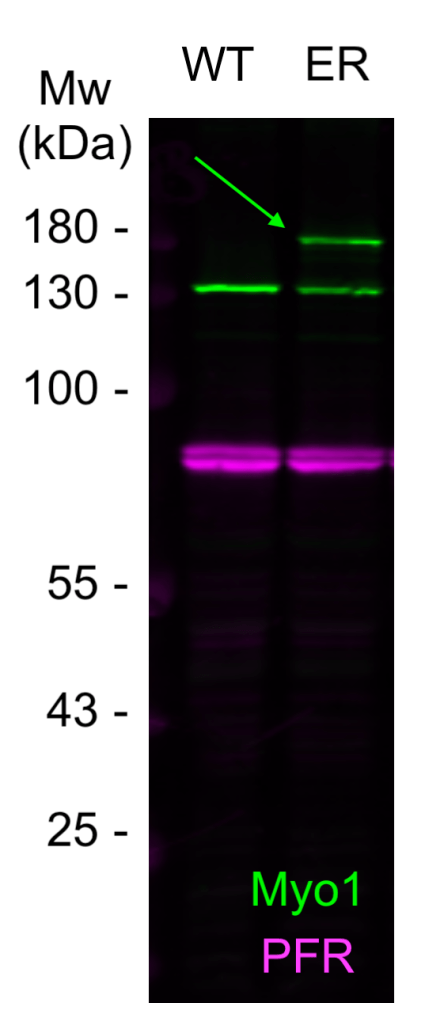
– The bare minimum. Does the antibody detect a protein of approximately the correct size in immunoblots? (Fig. 1)
– If you’ve generated your own antibody and you’re testing the neat antisera, then you will also have the pre-bleed available as a negative control (Fig. 2).
A basic immunoblot like this, while a lot better than nothing, is not enough by itself. It’s entirely possible that you have an unlucky cross-reaction with a protein of very nearly the same size as your intended target. It’s unlikely, but it does happen.
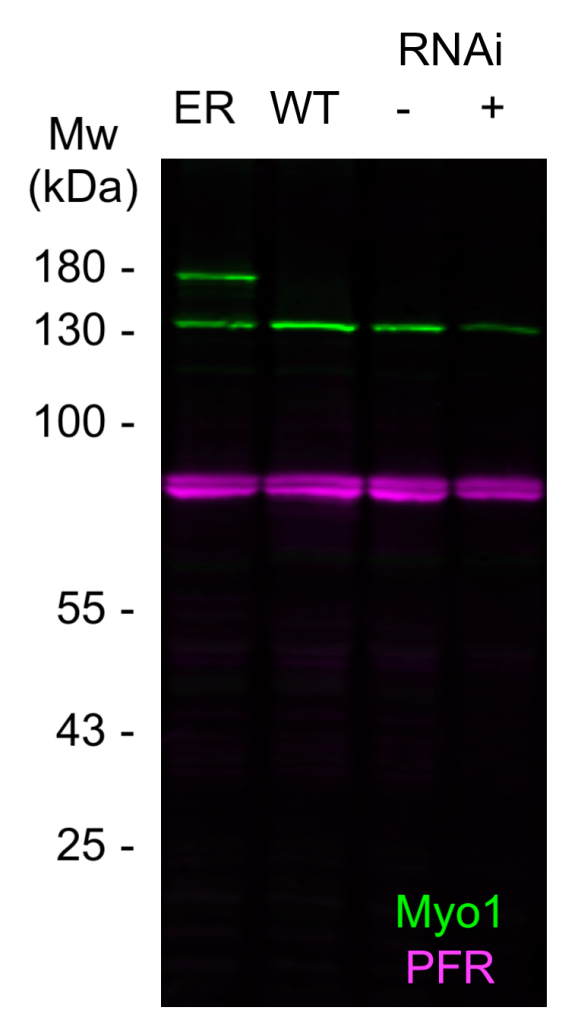
Step 2. Immunoblot of RNAi/knockout.
This is the gold standard. Prepare lysates from cells that have either been depleted of your target (e.g. using RNAi) or are knockouts of that gene. The lysates can then be immunoblotted alongside your wild-type controls. If you see that the protein recognised by the antibodies – which is already the correct molecular weight – is either depleted (RNAi) or lost (knockout) then you can have near certainty that your antibodies are specific. The chances that the antibodies are recognising some other protein which just happens to be the correct size as your target and also happens to be downregulated in tandem with your antibody are very low.
Step 3. Immmunoblot of tagged protein
It’s not possible to generate knockouts of essential genes, and depletion might not be readily doable either. Blotting a tagged version of the protein is a great alternative in these circumstances, and also a great complement to RNAi/knockout approaches. Generate a lysate from a cell line expressing a tagged version of your protein of interest, be it with an epitope, a fluorescent protein, whatever. When you do an immunoblot of these samples alongside your wild-type controls, you should now see a second protein – corresponding to the tagged version – being detected on the blot. If you’re dealing with haploid cells, tagging the protein will result in the loss of the untagged protein altogether. A nice additional control that’s possible in these circumstances is that you can use an anti-tag antibody to show that the new protein being detected is carrying the tag. Overexpressing your untagged protein is a less elegant but still viable alternative to this approach.
Put this together with Steps 1 and 2 and you can be very sure of antibody specificity indeed.
At this point the antibody specificity has been validated for immunoblotting, and you can use it with confidence for that and related applications (e.g. immunoprecipitations). But that’s not the end. Bear in mind that there are some antibodies which are specific for epitopes present in folded proteins, and these will not be competent for immunoblotting (it’s probably best to avoid using such antibodies for this very reason, but you don’t always have a choice).
Step 4. Immunofluorescence
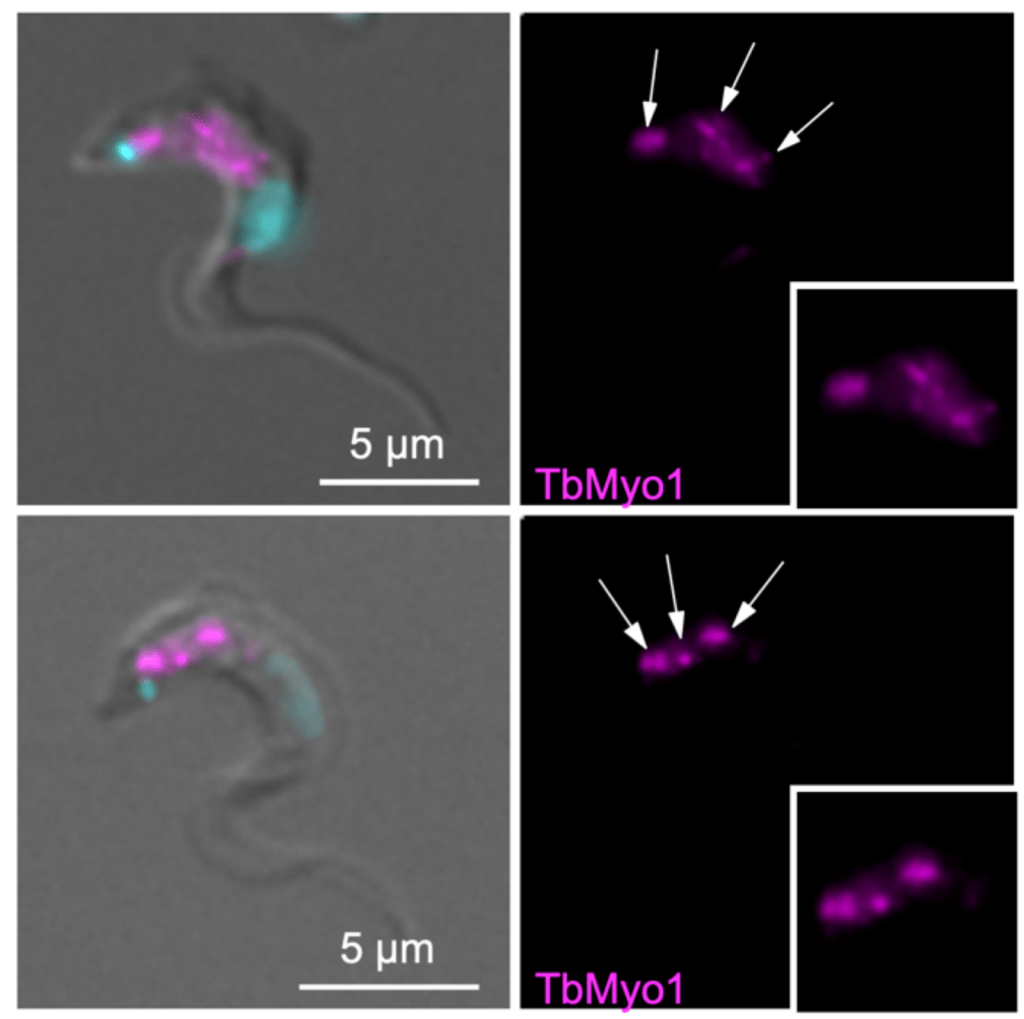
Just because an antibody has been validated by blotting, that doesn’t automatically mean that it will work for all applications. A major use of antibodies is labelling proteins in cells for immunofluorescence microscopy, and it’s well worth validating your antibodies for this application as well.
First, if the localisation of the protein is known, do the antibodies produce a labelling pattern that matches your expectations? Is the same labelling pattern seen when using different fixation conditions (e.g. paraformaldehyde vs methanol)? The big downside of immunofluorescence though is that it can’t tell you whether the antibodies are binding a protein of the correct size, so you never have the reassurance that you get from 1. in blotting. With this test alone, you can’t be sure whether the antibodies are binding to something else that happens to have the same expected localisation, or if the antibodies are binding to other proteins in addition to the one of interest.
Step 5. Immunofluorescence on RNAi/knockout.
Is the antibody signal weakened when the target protein is depleted (RNAi) or absent (knockout)? This is an essential control if you have an antibody that doesn’t work in immunoblots (perhaps because it only recognises folded epitopes). It’s not quite as compelling as Step 2 because you still can’t rule out the possibility that the antibody is binding to something which is indirectly affected by the depletion/knockout, but that is relatively unlikely.

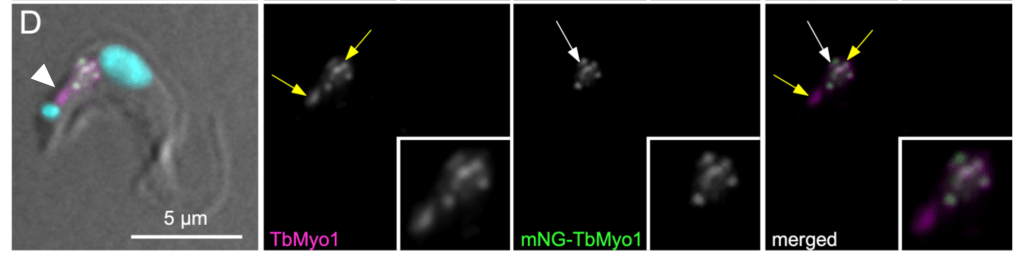
Step 6. Immunofluorescence on tagged protein
The same as step 3, but using immunofluorescence microscopy as the readout instead of immunoblotting. An anti-tag antibody should give a strong overlap (at the very least!) with your antibody; if overexpressing, the total signal should be stronger than in wild-type cells.
When should you validate?
Whenever you make a new antibody. Whenever you’re sent an antibody. Ideally also when you buy a commercial one, although the quantities provided may make that restrictive. An antibody needs validating for every application, especially if you’re planning on using it a lot or if there are important conclusions affected by the result. You cannot just validate for one application and assume that what you see in others can be uncritically accepted. And you especially can’t take an antibody that’s been validated in a different system (e.g a different organism) and assume that it works in your system without validation.
And besides validating an antibody, it’s well worth investing the time to optimise its performance, especially if it’s one you’re going to be using a lot. There are myriad variations for immunoblotting, immunofluorescence, and in fact all antibody applications, so feel free to experiment (supervisors: these kind of optimisations are excellent projects for undergraduate students).
If you know you’re going to be looking at a particular protein a lot, it’s almost always worth generating your own antibody. Generating your own antibodies is always a bit of a gamble (you don’t how immunogenic your protein is), but if you get a good antiserum then you basically have a lifetime’s supply and the range of experiments you can (economically) carry out goes up significantly.
Yes, it’s a lot of work but the good thing is that once it’s done, you can use that antibody with confidence from that point onwards – and that’s far better than realising at a late stage that you may have been looking at an artefact.
Acknowledgements:
Many thanks to Sisco Jung (Department of Cell & Developmental Biology, University of Würzburg), for letting me share his Master’s thesis data in this posting. Thanks also to Jake Kendrick-Jones and Folma Buss for drumming these principles into me when I was a PhD student.

The “How to” series are always my favourite TIR posts. I always learn a lot. Thanks Brooke. A minor comment I have reading this is that it sounds as thought the antibody validation should be a separate project. Rather if one included proper controls in their experiments, shouldn’t that serve as antibody validation?
LikeLiked by 1 person
Hi Calvin, thanks for writing, and that’s an important point in terms of practicality.
If you’re dealing with an antibody whose specificity has already been validated then yes, you’re absolutely right – the inclusion of appropriate positive/negative controls ought to be enough. (And a lot will depend on how critical the results obtained using that antibody are.)
If however you’re dealing with a new antibody, or one whose specificity has not been validated in that system, then validating the specificity is essential.
LikeLike